Honda certainly didn't use these bolts to hold this on!
As we start to address the fuel filler cap what we found was the evidence of historic repair, these two bolts were never there, the latch holder was tack welded onto the tank. The main issue here is space, the new pin was too large so we had to adapt a stainless steel one to suit. All part of the Four Bores day!
We managed to find the correct sized pin and the unit was refit satisfactorily, during any rebuild these moments can be terrifying as the tank is full finished and adjusting these makeshift bolts would almost certainly mean a respray!


It's Tyre time for Vanquish
Our new Bridgestone BT46's find their place on Vanquish. An easy task with the right tools, we used Seeley Tyre Levers which were more than up to the task plus a bit of Fairy Liquid
(other brands available :)
Difficulty rating 1/10
We take on a Esmerelda's Main Board
Part 1
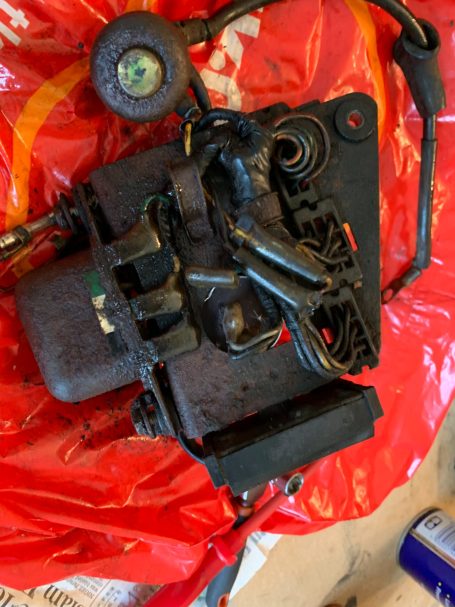
We take on the central board of our latest project CB500/4 Esmerelda, we are going to strip it right down, refinish where possible, replace where necessary and rebuild. The unit consists of a back plate which carries the rectifier, regulator, main fuse, indicator relay, starter electro magnetic switch an area where the wiring harness makes it’s main connections.
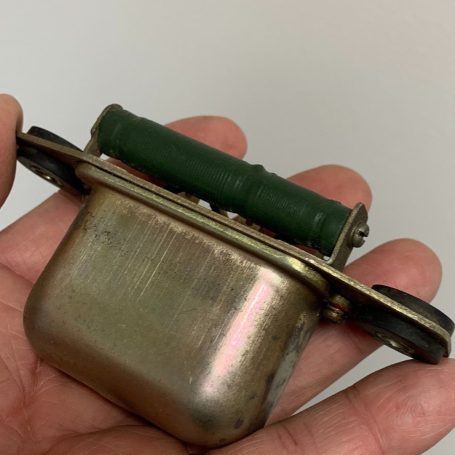
A brief description of these parts the rectifier converts the AC current from the alternator into DC, the regulator regulating the current to the battery. The main fuse is located in an inline fuse box, the indicator relay is a more simple device than it appears, a simple current creates a magnet field drawing an inner switch towards it and when the circuit is made and it cancels the magnetic field so it drops away, hence the clicking you can hear when operational. The electro magnetic switch allows the battery to send its full power to the starter motor without going through the harness, the switch is activated by a positive charge being created once the starter button is pressed, this action then creates a current which in turn activates the electro magnet switch which connects the main cable from the battery to the starter motor, this is is a positive wire being earthed out through the engine via the starter motors own unit completing the circuit as it in turn comes alive and rotates.
Now we know what we are working with you will be able to locate the wires in the wiring diagram, once cleaned of course.
It is worth a couple of days before you want to do this job set the item on a plastic bag and liberally apply penetrating fluid to give the bolts the best chance of releasing easy. It is also useful to pop some fluid where the rubber mounts are on the board, these will come off easier with a bit of assistance.
Start by gently pricing open the two wire brackets which are part of the base, use long nose pliers to ease them enough to release the wires. Then remove the rectifier, two bolts hold it in place, remove and disconnect the three wires. Then move on to the indicator relay, remove the two wires noting the location nd slide the unit out of its rubber mount. Next remove the electro magnetic switch and remove all rubber parts. Next remove the regulator with a single nut fixing it to the base.
Fully dismantle the board, be aware of the steel bushes used in the rubber mounts, these allow the unit to be bolted in place whilst damping the unit and should easily come free. The rubber gaskets are old so take your time but will pop out with a bit of effort.
Once the item is fully dismantled you can start the cleaning process, the wires will have years of grime on them but also be very oily and this will be your friend as they clean up amazingly well. Use a good degreaser and an old tooth brush with some tissue and bit by bit take the oily debris away, this takes a bit of care as the wires are close, a twist of the harness allows the wires to open up, some new black electrical tape over areas the old tape has lost it’s adhesion and you’re on your way.
The base board may look rough now but a trip to your local powder coater and this will be as good as new, the rubber holders and gromets we find come out well after vapour blasting, put them in with a load to keep the price down. Our rectifier was replaced as we found a fairly clean one on Ebay, the starter solenoid (electro magnetic switch) was good and the indicator relay was in amazing clean condition so we can reuse it. The main cable from the battery again was pretty good, a clean and reuse it.
Once the parts return from their various specialists it is reassemble time.
Some images of the job so far
More to follow ...
Allen Bolts may be one of the easiest 'modifications' you can get but the benefits are massive
You will have got a flavour of the bores and we just like it the way it was, well most of the time anyway.
Purists close your ears as we are going to try and convince you to move to allen keys, or, to give them their correct title 'socket head cap screws' as a valuable upgrade to your motorcycle and one, although not original, used by us in the late seventies as the stock bolts were pretty easy to destroy the head.
Allen bolts are readily available in zinc plated steel or stainless steel from your local tool merchant, both very reasonably priced with the better of the two stainless being between 10p each to 30p each (M6 20mm - 65mm) when buying in 10's, we have invested in a box to go with them as they tend to go in 5mm increments and this is difficult to see, easier to read a label obviously.
So, why? Well a couple of absolute no brainers are ease of removal and torque settings. With an allen head the withdrawal is done in total command of the bolt, you are typically holding the ratchet on an extension pressed firmly in place, and that is where the head stays, force is easily applied on the wrench and the bolt is nowhere near as capable as the socket head. With all Hondas of this age the head, you think looks like a Philips, is actually not, it is a JS (Japanese Standard) head, not a problem but it still is far less capable to apply pressure in an opening direction without the screwdriver head lifting out of position and damaging the head.
When putting back these bolts it is recommended to pop a bit of oil on the thread but even then they can be very hard to take out again, even with care damage can be done.
Allen bolts simply don't have this problem, the bit does not want to lift upon turning and as such stays put.
Then there is the tightness, we use 6Nm as being a benchmark, easy with the allen heads as we can use a small torque wrench, if you have not got one have a look at a cycle wrench, they are normally set to 5-6Nm and will do the job perfectly well.
We use Stainless bolts as we feel they look that bit better, in the olden days stainless was quite the thing so we are being closer to the way it was than you may think.
Cons, cost of course, that said we buy our bolts from a tool merchant, see suppliers and can be bought in small quantities for little money. Then there is authenticity and we agree, they are not as OEM supplied but they are probably closer to the bikes we actually rode?
David Silver still sells genuine bolts for various casings, we though won't be partaking in them, we will be picked up at shows but we will wax lyrical as to why we believe these are more right than wrong.
Esmerelda's Total engine rebuild
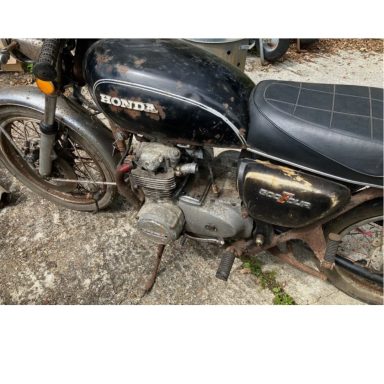
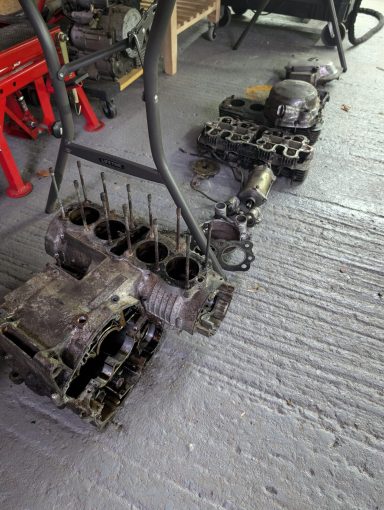
We acquired this engine from the black bike pictured, really more as a job lot of parts than a bike to be honest from the Isle of Wight, We have taken a view on her and are about to do a complete nut and bolt renovation, the engine though we were not sure if it was too far gone and could not economically be saved, it had sat for many years without pipes on and was in an absolute mess, that said "luck favours the brave" as they say so out she went for stage one, lets have a look and see what we have got!
Well the good news it we have a good engine, okay it needs some cosmetics but the working parts are in amazingly good nick! The oil was really dark but the strainer was free from major debris, the cambelt tensioner still had the original grooves and was in really good condition, nice and strong, very good. The gear selector was as it should be, the gears all present without any teeth missing, this was a really underused engine, yes possibly a rebore and new pistons, a new cam belt of course but other than that we are talking vapour blasting and a new process we are going to be the first to try a clear coat for the engine, exciting! We will show you more as we progress with her.
For now see a pretty grubby but totally sound CB500/4 engine on the bench and the even more grubby bike!


New Clocks CB400/4 F1
Restoration of a working set of clocks
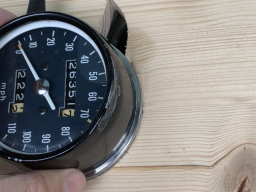
These are difficult to get open and indeed closed, we used a simple wooden jig that we knocked up in the workshop, see image, where the clock sat neatly into it, we used a soft cloth on the face to give some protection on the closing as it was freshly painted (not shown). You can see the clock fitted in both ways up to make things so much easier. One point we ended up putting a reinforcement in the centre underneath as the pressure we were putting on the clocks to hold them in place for resealing was quite a lot!
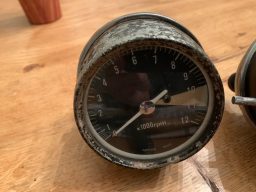
To see the transformation look at the old clock image, believe it or not that is the same one!
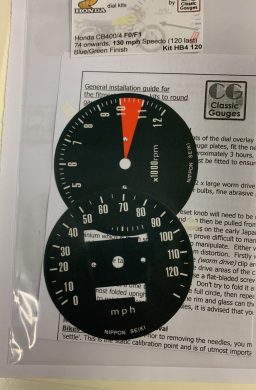
We acquired new faces for the clocks, see image, find a supplier with good feedback is good advise here.
A CB400/4 showing it's feminine side, really!
Difficulty rating 4/10


CB500/4 Clutch adjustment
To reset a clutch or address a heavy clutch on a CB500/4 K1 there are a few things worth knowing..
Firstly if you have a heavy clutch there are five easy fix culprits, firstly the cable is possibly rusty inside and needs replacing, if this is not the problem check the cable routing, make sure it has not been forced around in a way it is uncomfortable, this will also work against an easy clutch and thirdly ensure the lifter, see picture, is well greased and moves freely.
If these are all okay remove the plunger rod and ensure it is perfectly straight and free from any debris, if there is any grit on the rod thoroughly clean, grease and reinsert. Finally you get to adjusting the lifter, the main way of adjusting the clutch on the CB500/4 K1.
To check the adjustment of the lifter you need to release the 10mm bolt on the outer casing, see image, turn the large flat headed slot until the lifter is in its most retracted position, then with all the cables let off to their loosest setting turn the adjustment slot in a clockwise direction until it bites, then back a smidge. Once set retighten the nut to lock it in position. Now you have set the lifter to the right setting take up the slack on the cable with the base and lever adjustments as necessary. Check the clutch is working safely before taking the bike out, these are not instructions on how to do the job simply information as to what we did. If you are not 100% confident in what you are doing don't do it and contact your local garage.
Can be tricky, 5/10 Difficulty level
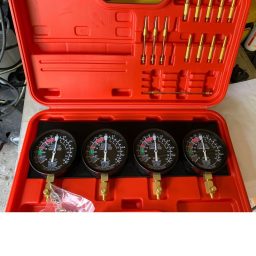


Vanquish get's her Carb Balanced
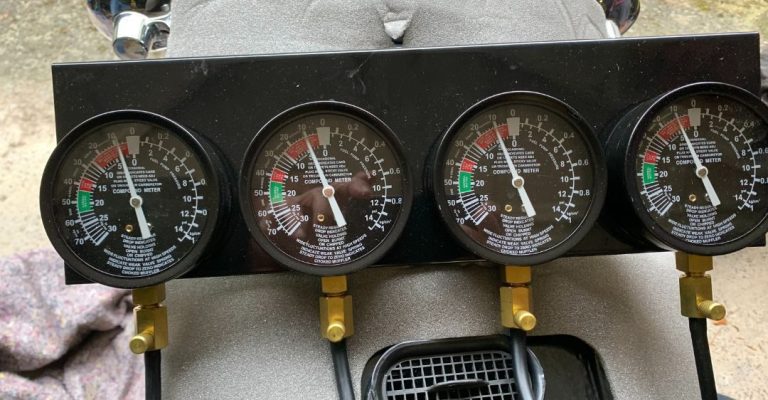
Tools required 4 Cylinder Sync Gauges Kit for Carburetor Carb Balancer, Includes Vacuum Gauges, Hoses, Extensions, Adapters
Carbs are really not as bad as you may fear, the basics of balancing them is not so much to set them at a certain level, rather than get them all even, we found when we watched videos on the subject it was easy to get tied up with aiming at a certain vacuum setting, this ended up not to be as critical as an even set for all four.
To balance the carbs ensure this is one of the final jobs you do, the bike should be fully set up, all the timing etc done in advance. Then you can start. Begin by setting up a petrol source that allows you to remove the tank, you need access to the top of the carbs, then set your carb balancing set up by taking out the small screws in the inlet manifold, insert the adapters fixed to your tubes in the screw openings and attach the dials. Make sure you are working in the open air, start up the bike and set the tick over to about 2500 - 3000RPM, this will show the dials bouncing a bit, on some models use the grub screw in each dial to settle the needle.
The air intakes are positioned on the top of the carburetors, these need to have the 8mm locking bolt loosened off, then using a small flat headed screwdriver gently adjust the inner screw to set the needles on your dial equally. You will feel the engine changing for the better or worse as you adjust this so use your ears also. Once these are all reading the same settings you should see the engine running more smoothly, a blip of the throttle will be quick and responsive, then lock up the locking bolts and your there. It is important to make sure you are running at the right mixture or you may have overheating problems, to do this make sure your fuel inlets are all set as the manual states, here we used 2 turns out, when balancing the carbs if you struggle to start the engine and your getting a good spark use the fuel inlets to open the amount of fuel until you get it right but one and half to two turns out was right for us.
Once you take off the equipment remember to reinsert the small screws to lock off the inlet manifold, back on with the tank and your done.
As always this is only the way we have done the job, please read your manual to get the correct way for your specific bike, if you are in doubt don't do it, get in touch with your local garage.
Difficulty level 3/10 with the right tools
Esmerelda
The elements have really tried there best to kill this old Honda but you know, we think she has a chance!
The Frame
Truthfully pretty rough but there are probably worse out there. We will need to be careful that all the welds are still in good shape so powder coating does not simply cover any serious issues. Parts are already being prepared, the rear swinging arm, side and main stand, tail light assembly (she, as with all our bikes) is English so it's black not chrome, are already done. The next batch includes the exhaust brackets, battery box and various brackets on the bike.
The Electrics
Wiring is always an issue as anyone who has worked on these bikes will know the earth is so important, especially now we powder coat the old frames, not that the earth goes through the frame typically, but it does in places for example the front indicators. Anyway corrosion of the connectors is usually the main culprit. Still the actual harness when you open one up, even after 50 years, is normally very clean. The regulator looks tatty, probably works though as with the rectifier. The harness is in parts, we may end up replacing the rear for looks as you see it when the seat lifts but otherwise it is a clean up job we hope.
The Wheels
The wheels are in a bad state, to be fair they typically are. These will be our first wheel rebuild using DID rims, the hubs will have the bearings taken out and replaced where necessary and vapour blasted, new steel spokes and a pair of new boots will complete the picture hopefully!
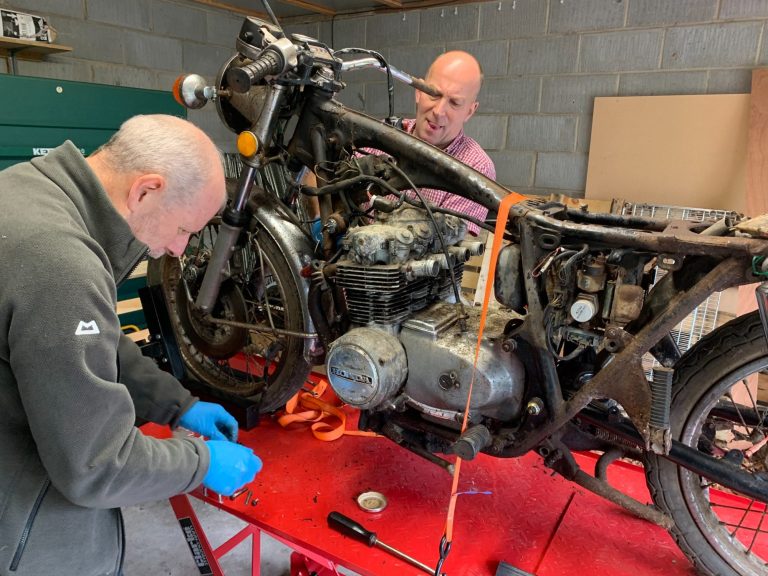

The Front End
Well the good news is it is there, obviously the head will need a look, hopefully a good clean and grease together with the correct torque on the head should do the trick. Re the clocks these are a total rebuild but there not too bad actually. New hydraulics would be wise, a front brake overhaul is in order and a look at the stanchions. There is some chrome work on the top end but it will all go in together.
The Tank seat and sidepanels.
We luckily have a tank and side panels in the paint shop going to be the beautiful Bucchus Olive Green and the seat will be off to Saddlecraft for a total refurb, they will powder coat the base, replace the foam and cut a new cover. Once again it is all there, this is really something I think newcomers to the hobby can learn from, if the bike your buying is all in front of you at least you know what your dealing with, if not getting the correct parts at anywhere near a good price is becoming more and more difficult.
The Engine
Looks pretty bad doesn't it? Well as it has stood for goodness knows how many years without pipes or carbs on you would not be expecting much, but you would be wrong. The engine has had little use and is in amazingly good condition, see our section on the total rebuild of a CB500/4 engine. It will be a diamond we think when ready.
Some images to show you how far a bike can go and still, we think, get back to show quality!
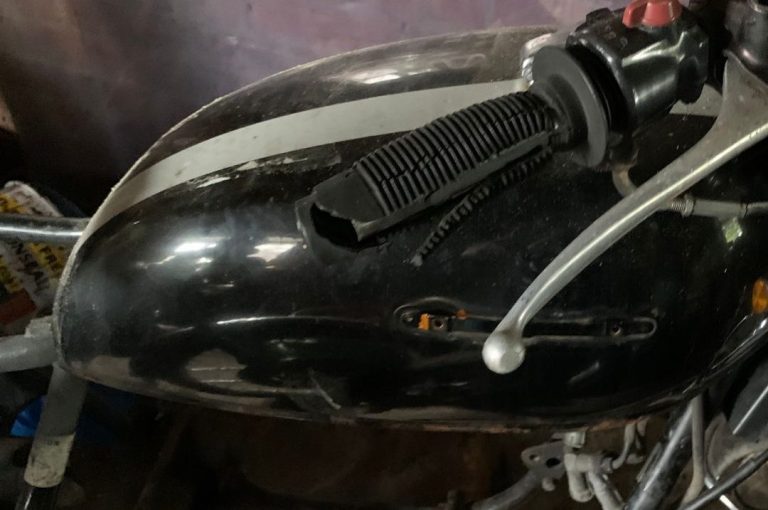
Tank CB500/4
Tanks are a massive part of a restoration, they are one of the shiny bits we all touch and comment on, that said the insides can be a real problem, this one however is really clean ... inside anyway!

Clocks
Clocks are so important on a rebuild, almost always the dials are showing signs of age, primarily sun fade but also the casings are covered in chips and scratches, still mostly they are saveable with some time and care!

The Frame
Someone has gone to a lot of trouble and no doubt cost chroming this frame, we see a lot of different approaches over the years to make the bikes more "bespoke", for us it is originality that matters, within reason. Will she stay chrome? No, of course not, she will be returned to her original black, in powder coating not paint although original was paint we find it just looks better ... so did the guy who chromed this I guess, sorry buddy!

Switchgear
Originals are originals, yes you can get reproductions today but a bit of time and some red paint and your away. Very tricky inside as they have ball bearings all over, tiny connectors etc, that said where's the fun otherwise!

Wheels
Tricky one wheels, we think best left to the professional to be honest, the lacing is all well and good, replacement parts are abundant but to get the wheel set at the right place on the hub, that is in the right line left and right, exactly, is not for the amateur, to the wheel man methinks!

Alloy Castings
Ive seen worse, these though typically can be brought back to shiny new condition. Always remember that if the alloy is there it will buff up, takes time of course, beware if it is so far gone the metal is literally pitted beyond polishing, rare but happens.
© Copyright. All rights reserved.
We need your consent to load the translations
We use a third-party service to translate the website content that may collect data about your activity. Please review the details in the privacy policy and accept the service to view the translations.
